After upgrading my Ubuntu from 12.04 to 14.04, I had a problem with the desktop environment. Oh by the way, I’m using VirtualBox with newest version. So Ubuntu 12.04 said if I insist upgrading to 14.04 then you will have desktop problem. Nothing to lose so I accept the upgrade then it goes around until finished with the upgrade then reboot the Ubuntu.
The default desktop environment in Ubuntu is Unity. I had small memory and there is some lag with the Ubuntu I’m using after upgrade. So I try to log in to bash terminal to find the problems. Even the bash terminal is freeze. Gosh, so reboot again then log in to bash terminal without login to desktop. I have to change my desktop environment from Unity to another light one. I prefer LXDE than XFCE. If you want to know what is the different you can try to find in the google. So I chose LXDE because it is ligher than XFCE. There is another distro using LXDE called Lubuntu. You can try it if you want.
Using apt I try to install Lubuntu Desktop Environment using this command:
$ sudo apt-get install lxde
This command will install the vanilla one from the desktop environment. If you want to have more Lubuntu-like, you can try install by using this command:
$ sudo apt-get install lubuntu-desktop
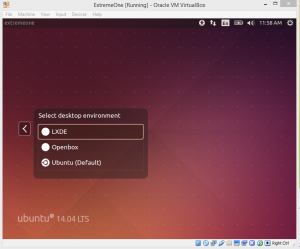
After done install the new desktop environment you can reboot the machine. Here is the login before entering the desktop environment from figure 1.
There is a white circle in the right of your login name. Click on it and you can see there is another option for another desktop environment. Here is the detail in the Figure 2.
 Fig 2. Another desktop environment
Now choose LXDE for the light desktop environment then login. Look into the Figure 3 below for the detail.
 Fig 3. LXDE desktop environment
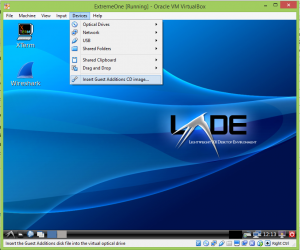
You have new look but the window from the VirtualBox still not in maximum resolution. To have maximum resolution you have to install VirtualBox Addition. In the main menu of VirtualBox you can click the Devices >> Insert Guest Additions CD Image. You can look into the Figure 4 for the detail.
 Fig 4. Install VirtualBox Additions
Let the VirtualBox do the rest. After finish install the the Guest Additions then you can try to reboot the machine again and voila !. Your Ubuntu now is in maximum resolution. So everything is light and contrary your graphical content is not as good as Unity and I don’t mind as long as the performance rocking.
Actually there is another problem. The XTerm look is not so nice for my eyes so I had to change it to another size and color. You can create a file within you home directory like this.
$ touch ~/.Xresources
Using nano or any your favorite text editor add this line in Xresources file.
XTerm*Foreground: green
XTerm*font: 9×15
Save the file and close your XTerm and open it again. If it is not work then you have to logoff and login again to your desktop environment. Okay that’s all for now.


